

The fastest, highest-impact fix is applying an anti-icing product before precipitation hits, then clearing snow promptly and treating what’s left with the right ice melt for the temperature. Add sand or traction granules for immediate grip, and consider heated mats or drainage fixes for spots that ice up every single storm. Whatever you do, use the handrail and skip the boiling water trick.
TL;DR:
- Applying anti-icing products before a storm prevents ice from bonding to concrete, making removal easier and more effective than reactive deicing.
- Calcium chloride and magnesium chloride outperform sodium chloride at low temperatures and are gentler on surfaces, especially during deep freezes.
- Mechanical removal with a plastic shovel and careful ice chipping speed up clearance, reducing chemical use and surface damage.
- Physical traction options like sand, traction granules, rubber treads, or heated mats provide immediate grip and long-term safety improvements.
- Drainage issues and runoff direction are common causes of persistent icing, and fixing water flow prevents recurring ice formation more effectively than chemical treatment.
Table of Contents
- What is the best way to prevent ice on steps?
- How do you safely remove ice that’s already formed?
- What traction options work best in the moment?
- Does the step material change how you should treat ice?
- Why do some steps ice up every single storm?
- What’s a realistic daily storm routine?
- How does a property maintenance crew handle recurring ice?
- When is DIY enough, and when do you call a pro?
- Get help before the next freeze hits
- Sources
- FAQ
What is the best way to prevent ice on steps?
The single biggest mistake homeowners make is waiting until steps are already glazed over to do anything about it. Anti-icing means applying product before snow or freezing rain arrives, so a bonding layer never forms between ice and concrete. Deicing, by contrast, is the reactive scramble to melt ice that’s already locked onto the surface, and it takes far more product and effort to get the same result.
The efficiency gap between the two approaches is significant. Applying deicer before a storm is dramatically more effective at preventing bonded ice than trying to break that bond afterward, because prevention stops the ice-to-concrete adhesion from ever forming in the first place.
Pro Tip: Check the forecast the night before. If freezing rain or snow is expected within 12 hours, treat your steps that evening. Waiting until morning means you’re now fighting ice instead of preventing it.
Not all ice melts work the same way, and picking the wrong one for the temperature outside wastes your money and your time:
- Sodium chloride (rock salt) is cheap and widely available but loses effectiveness at very low temperatures.
- Calcium chloride works well in colder temperatures and generates heat as it dissolves, making it a good choice for cold snaps.
- Magnesium chloride is generally gentle on plants and concrete and works effectively in cold conditions.
Calcium and magnesium chloride outperform sodium chloride at low temperatures, and the choice affects both melt performance and long-term surface health.
For application, a light, even coating is all you need. A heavy dump of granules doesn’t melt faster. It just wastes product and tracks into your entryway. Reapply only after fresh snowfall or once the treated layer looks fully dissolved, not on a fixed schedule. If you’re unsure how much your steps and walkways actually need for the season, our ice melt calculator breaks it down by square footage. Keep pets away from treated areas until it’s swept or rinsed, and avoid pouring melt directly onto flower beds or grass edging.
How do you safely remove ice that’s already formed?
Once ice has bonded to a step, chemical treatment alone is slow. Mechanical removal combined with the right deicer clears steps faster and with less product.
- Shovel first. Clear loose snow before it compacts into ice. Use a plastic or rubber-edged shovel, never metal, since metal edges chip and scratch concrete, wood, and stone.
- Work top to bottom. Clearing the top step first stops meltwater and debris from recontaminating steps you’ve already cleared below.
- Chip stubborn ice carefully. A plastic ice chipper or the flat side of a shovel works for thick ice. Strike at an angle, not straight down, to avoid gouging the surface underneath.
- Apply the right melt for the temperature. Rock salt for mild cold, calcium chloride for deep freezes, magnesium chloride where you want less impact on plants and pavement.
- Sweep away residue once melted. Leftover salt residue corrodes metal railings and stains concrete over time if it sits through repeated freeze-thaw cycles.
Some homeowners swap in a rubbing alcohol and water mix as a quick DIY melt for small icy patches. It can work in a pinch, but it carries real refreeze risk in deep cold and can leave residue on painted or sealed surfaces, so treat it as a stopgap, not a routine tool.
What traction options work best in the moment?
Sand, kitty litter, and traction granules won’t melt anything, but they give your boots something to grip when ice can’t be cleared right away. Sand is cheap and effective, though it tracks indoors and needs sweeping up come spring. Non-clumping kitty litter works in a similar way and is often what people already have in the garage.
For repeat problem areas, physical upgrades outperform anything you pour on:
- Rubber or adhesive stair treads grip boots directly and hold up through an entire season without reapplication.
- Portable heated mats sit on top of existing steps, plug in, and melt snow and ice on contact. Expect to pay roughly $100 to $300 per mat, and some models sync with snow or temperature sensors to switch on automatically before you even step outside.
- Textured anti-slip coatings applied to concrete add permanent grip without changing the step’s look much, which suits high-traffic entries that ice up every storm.
Focus placement on the top and bottom steps first, since that’s where most falls happen, then cover any edge without a handrail nearby.
Does the step material change how you should treat ice?
Yes, and using the wrong product on the wrong surface causes damage that costs more to fix than the ice ever did. Matching your method to the material protects both safety and the surface underneath.
- Concrete: heavy, repeated sodium chloride use accelerates surface flaking known as spalling. Calcium or magnesium chloride is gentler, and resealing every two to three years helps block the moisture that drives freeze-thaw cracking.
- Wood: avoid rock salt entirely. It draws moisture into the grain and speeds up rot. Rubber mats, adhesive treads, and a properly sealed surface are safer long-term bets than any deicer.
- Metal: salt residue left sitting on metal stairs or railings corrodes the finish quickly. Grit or sand plus prompt rinsing once temperatures rise works better than chemical melt.
- Stone: natural stone stains easily and is vulnerable to freeze-thaw cracking. Lean on mechanical removal first, then a milder deicer applied sparingly rather than a heavy chemical dose.
Why do some steps ice up every single storm?
If the same three steps turn into a skating rink every time it snows, the problem usually isn’t your deicing routine. It’s drainage. Roof runoff dumping straight onto steps, a low spot that pools water, or a downspout aimed at your entryway will refreeze the same patch night after night no matter how much salt you throw at it.
Improving drainage and directing runoff away from walking surfaces is one of the more overlooked fixes for chronic icing, alongside chemical treatment and mechanical clearing. Fixing the water source solves the problem for good instead of managing it every week.
- Extend downspouts at least four to six feet from any step or landing.
- Regrade small low spots near the entry so water runs away, not toward, the stairs.
- Install a French drain if runoff pools consistently across a wider area.
- Reseal concrete steps to reduce water penetration between freeze-thaw cycles.
Heated systems are the higher-cost, higher-payoff option for spots that just won’t quit. Portable mats run $100 to $300 per mat, while permanent embedded radiant heating installed under steps costs roughly $500 to $1,000 and eliminates the daily clearing routine entirely.
| Fix | Typical cost | Best for |
|---|---|---|
| Downspout extension | Low | Roof runoff hitting steps |
| Regrading a low spot | Moderate (landscaper labour) | Standing water near entry |
| Portable heated mat | $100 to $300 per mat | Small, specific problem steps |
| Embedded radiant heating | $500 to $1,000 installed | Chronic, whole-stair icing |
Grading work calls for a landscaper, while wiring a permanent heated system means bringing in an electrician. Our preventive snow and ice management guide walks through identifying these hidden causes before winter sets in.
What’s a realistic daily storm routine?
You don’t need a complicated system, just a sequence you actually follow every time it snows:
- Clear the top and bottom steps first, since that’s where falls concentrate.
- Check shaded corners and north-facing steps separately. They hold ice long after sunny spots have cleared.
- Reapply a light dusting of ice melt only where it’s needed, not across the whole surface out of habit.
- Fix or tighten any loose handrail before the season starts, and add motion-activated lighting near steps for safer evening use.
- Keep a small bucket of sand or grit and a plastic shovel by the door so you’re never caught without tools mid-storm.
Footwear matters more than most people admit. Boots with a deep, flexible tread outperform anything with a flat sole, ice or not. If steps serve older residents or anyone with mobility concerns, a bit of reflective tape on the edges and a broader home safety review go a long way toward preventing a fall before it happens. Our own snow removal tips for Calgary winters cover a few more storm-day habits worth building in.
How does a property maintenance crew handle recurring ice?
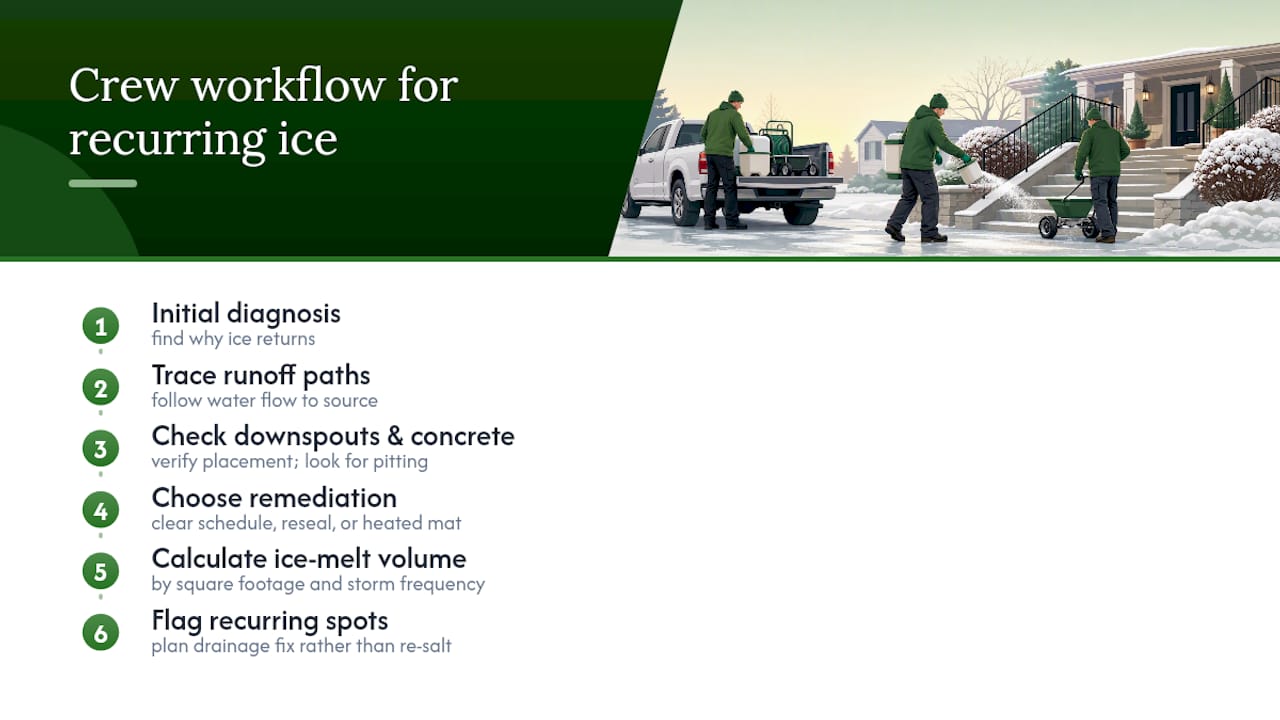
When Yearlong gets called out to a property with steps that ice up every storm, the first visit isn’t about salt. It’s about figuring out why the ice keeps coming back. That usually means tracing runoff paths, checking downspout placement, and looking at whether the concrete itself is already pitted from years of the wrong deicer.
From there, the fix might be a scheduled clearing route timed to hit before a freeze, a resealing job to stop water penetration, or coordinating a heated mat install for a stubborn shaded landing. Ice melt volume gets calculated by square footage and typical storm frequency for the property, not guessed at bag by bag. Recurring problem spots get flagged for a drainage fix rather than another season of the same salt bill.
When is DIY enough, and when do you call a pro?
Most steps just need a consistent routine: anti-icing before the storm, a shovel that doesn’t scratch concrete, and the right chloride for the temperature. That handles the vast majority of winters just fine. Where it stops being a DIY problem is when the same patch ices up every single storm despite your best efforts, when someone in the home has limited mobility, or when you’re a landlord or property manager carrying liability for every step on the property. At that point, a drainage assessment or a heated mat quote pays for itself the first time it prevents a fall.
— Lewie
Get help before the next freeze hits
There’s a real difference between managing ice yourself, step by step, storm by storm, and having someone who already knows why your specific steps ice up and what actually fixes it. Professional property maintenance crews handle scheduled snow clearing, proper deicing timing, drainage corrections, concrete sealing, and coordination for heated mat installs as permanent solutions instead of repeated deicing.

If your steps have been a problem all season, or you’d rather not think about it at all this winter, a quick property assessment tells you exactly what’s causing it and what it’ll take to fix. Book a free quote through Yearlong’s snow removal service and get your steps handled before the next storm rolls in.
Sources
- Snow & ice removal from walking surfaces vs falls | InspectApedia
- Preventing ice buildup: Effective strategies for safe concrete steps | ShunTool
- Winter walkway ice prevention: Keep your property safe and liability-free | HireLocal
FAQ
What can I put on my steps to make them less slippery?
Sand, non-clumping kitty litter, or traction granules give immediate grip without melting anything, while rubber stair treads or textured anti-slip coatings offer a permanent fix for steps that ice up repeatedly.
How do I make outdoor steps non-slippery?
Combine three things: clear snow promptly with a plastic shovel, apply calcium or magnesium chloride based on the temperature, and add physical traction like sand or adhesive treads for the moments in between.
Is rock salt bad for concrete steps?
Heavy, repeated use of sodium chloride can accelerate concrete spalling over time, so calcium or magnesium chloride plus periodic resealing protects the surface better through a full winter.
Why do my steps ice up even when I’ve salted them?
Persistent icing usually points to a drainage problem, such as roof runoff or a low spot directing water onto the steps, rather than a salting mistake, and fixing the water source solves it for good.
When should I hire a professional for ice on my steps?
Call a pro when the same steps ice up every storm despite consistent treatment, when mobility-limited residents use the entry, or when liability is a concern for a rental or managed property.