

Most acrylic sealers are safe for light foot traffic in 4 to 24 hours and for vehicles in 24 to 72 hours, but temperature, humidity, and sealer chemistry stretch those windows fast. The general rule is to follow the minimum cure times listed on your product’s technical data sheet and consider adding extra buffer time in cool, humid, or shaded conditions.
TL;DR:
- Full curing of acrylic sealers takes up to 7 days under ideal conditions, but surface dryness can occur much sooner, often within hours.
- Cooler, humid, or shaded conditions extend sealers’ cure times by several hours or days, requiring extra buffer time beyond manufacturer estimates.
- Recoat windows typically range from 4 to 24 hours, and applying too early or too late can cause bubbling, poor bonding, or surface hazing.
- New concrete must cure at least 28 days before sealing with standard products, while cure-and-seal options are designed for application within hours of finishing.
- Waiting for appropriate weather conditions, surface dryness, and conducting simple tests ensure an effective seal and prevent common failures.
Table of Contents
- How long does concrete sealer take to cure? Timing at a glance
- What affects concrete sealer cure time?
- Cure-time ranges by sealer type: what to actually expect
- How to plan application day and schedule traffic
- When to seal new concrete versus existing concrete
- Common problems from getting the timing wrong
- Simple tests to check if sealed concrete is ready
- How long to wait between coats of sealer
- Weather, safety, and handling precautions before you seal
- Yearlong perspective: what actually changes the timeline on real jobs
- Concrete sealing service: what we do and how to book
- Sources
How long does concrete sealer take to cure? Timing at a glance
Cure time for concrete sealers depends heavily on which chemistry you’re using, but the ranges below give you a realistic starting point for planning around your own schedule. Manufacturers publish these figures on their technical data sheets under ideal lab conditions, usually around 21°C to 24°C with moderate humidity, so treat every number here as a floor, not a guarantee.
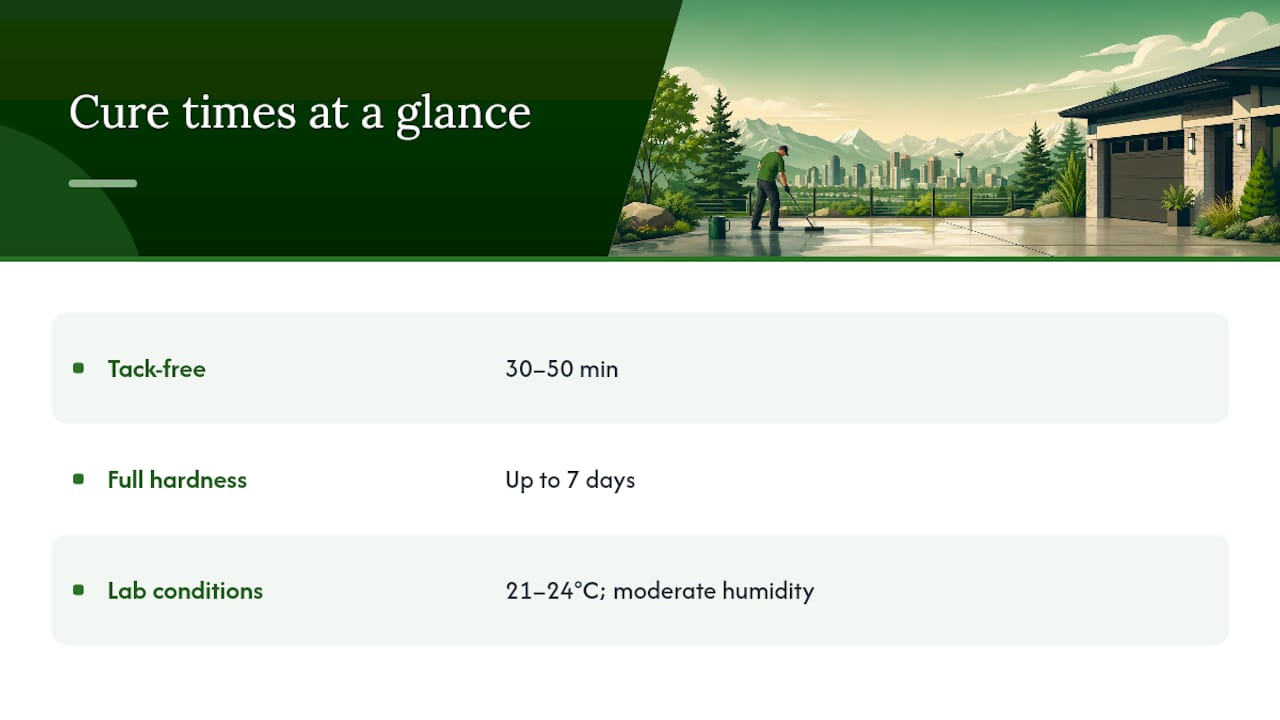
The EVERCLEAR technical datasheet puts full hardness for a typical acrylic film-former at up to 7 days, even though the surface feels dry and walkable long before that. A cure-and-seal product applied directly to fresh concrete tends to firm up faster on the surface (tack-free in 30 to 50 minutes) but still needs about a week to reach maximum hardness underneath.
These numbers assume flat, sunny, well-ventilated conditions. A shaded north-facing patio or a driveway tucked against a fence line will run slower every single time, sometimes by half a day or more. Always cross-check the exact product’s TDS before committing to a schedule, since formulations vary even within the same brand’s product line.
What affects concrete sealer cure time?
Cure time isn’t fixed. It’s the product of five variables working together, and any one of them can quietly add hours or days to your plan.
- Air and substrate temperature. WR Meadows recommends an application window of roughly 10°C to 27°C. Below 10°C, solvents and water evaporate too slowly, and film formation stalls. Above 27°C, the surface can skin over before the layer underneath finishes curing, trapping solvent and setting up bubbling later.
- Relative humidity. High humidity slows evaporation the same way cold does. Fog, heavy dew, or a forecast rain shower within the cure window is one of the most common reasons a sealing job fails.
- Sealer chemistry and solids content. Higher-solids solvent-based acrylics generally cure slower than thinner water-based versions because there’s simply more material that needs to flash off.
- Coat thickness and application method. A heavy, uneven coat traps solvent underneath a skin that’s already dry on top. Rollers, sprayers, and squeegees all lay down different film thicknesses, and thicker isn’t better.
- Substrate moisture and porosity. A porous slab that hasn’t fully dried, or one sitting over a damp subgrade, will pull moisture upward into the sealer film long after the surface looks ready.
Pro Tip: Check the substrate, not just the air. A slab in full shade can sit 5°C to 8°C cooler than open pavement nearby, which is often the real reason two driveways sealed on the same day cure at completely different speeds.
Manufacturer TDS values are baseline numbers from controlled testing, and site conditions routinely shift the real-world timeline. Wind, direct sun exposure, and slab porosity aren’t part of a lab test, but they’re part of every real driveway, patio, or garage floor you’ll actually seal.
Cure-time ranges by sealer type: what to actually expect
Not all sealers behave the same way once they hit the concrete, and picking the wrong timing assumption for your product type is the most common planning mistake homeowners make.
Acrylic film-forming sealers (water-based and solvent-based) sit on top of the slab and form a continuous film, which is why they’re sensitive to thickness and weather. Water-based versions dry to touch in roughly 1 to 2 hours and generally allow light foot traffic within 4 to 6 hours. Solvent-based acrylics often run a notch slower on vehicle traffic, commonly needing 48 to 72 hours rather than the 24 to 48 hours typical of water-based products, since solvent evaporation takes longer than water evaporation in similar conditions.
- Recoat window: usually 4 to 24 hours, depending on the product.
- Full hardness: up to 7 days per the EVERCLEAR datasheet.
- Best suited to driveways, patios, and garage floors where you want a visible sheen.
Penetrating silane/siloxane sealers don’t form a surface film at all. They soak into the pores of the concrete and react chemically below the surface, which means there’s no tacky film to worry about and foot traffic is often fine the same day. Full water-repellent performance, however, can take 3 to 7 days to develop as the reaction completes inside the slab. That’s a longer window than most people expect, given how quickly the surface feels normal to walk on.
- No visible film means no ghosting risk from foot traffic.
- Vehicle traffic timing still follows similar 24 to 48 hour caution as film-formers, since you’re protecting the reaction process, not a coating.
- Best suited to exposed aggregate, stamped concrete, and surfaces where you don’t want a glossy look.
Cure-and-seal products are a special case because they’re designed to go on fresh concrete, sometimes within hours of finishing, rather than on a cured slab. According to the Bullbond TDS, tack-free time runs 30 to 50 minutes, light traffic is fine in 3 to 4 hours, and normal traffic in 24 hours. These products double as a curing compound and a surface sealer, so the timing logic is different from sealing an already-cured driveway.
- Applied 4 to 6 hours after placement under typical conditions, per TK Products.
- In hot, windy weather, that window can shrink to 2 to 3 hours because the concrete dries faster than usual.
- Best suited to new pours where you want one product to handle both jobs.
Solids content changes all of this math. A higher-solids product lays down more material per coat, which extends both the recoat window and the full-cure timeline, even within the same product family. If your label lists a solids percentage, treat a higher number as a signal to add buffer time, not just thicker protection.
How to plan application day and schedule traffic
Getting the timing right starts before you open the can. Follow this sequence and you’ll avoid the two mistakes that cause most sealing failures: rushing the surface prep and rushing the recoat.
- Check the 24 to 48 hour forecast. Confirm no rain, heavy dew, or fog is expected during application and the initial cure window. The Quikrete guide specifically warns against applying if temperatures below 10°C or precipitation are forecast within 24 hours.
- Clean and rinse the surface, then let it dry fully. A slab that looks dry on top can still hold moisture just below the surface, especially after a rinse. Give it several hours minimum in warm weather, longer in cool or overcast conditions.
- Apply two thin coats instead of one heavy coat. This is standard practitioner advice for a good reason: a thick single coat can trap solvent underneath a skinned-over surface, which is exactly what causes bubbling and cloudiness later.
- Maintain a wet edge as you work across the surface, and back-roll if you’re using a sprayer to even out thickness and avoid lap marks.
- Respect the recoat window for your specific product before applying the second coat, then let the full system cure per the TDS before allowing traffic.
Here’s how that plays out in practice. On a warm, dry day around 24°C, you might rinse the slab in the morning, let it dry by early afternoon, apply your first coat around 2 PM, recoat around 4 PM, and allow light foot traffic by early evening. Vehicles wait until the following afternoon at the earliest.
On a cooler day around 12°C to 15°C with higher humidity, that same schedule stretches out considerably. Expect to wait a full day between cleaning and application to guarantee dryness, and the Quikrete data sheet recommends 10 to 12 hours minimum before any traffic in cool conditions, versus the shorter windows possible in warm weather.
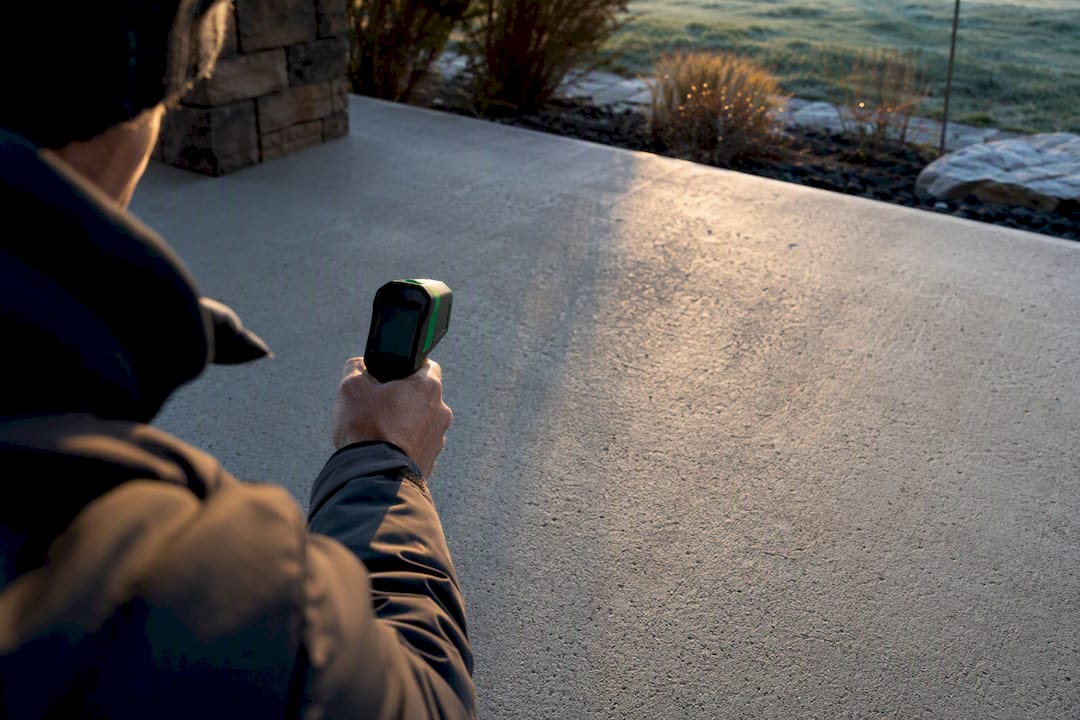
Pro Tip: If you’re not sure whether conditions qualify as “cool” or “warm” for your product, check the substrate temperature with an inexpensive infrared thermometer rather than trusting the air temperature on your phone’s weather app. Concrete surface temperature can run several degrees off from ambient air, especially in early morning or late afternoon.
Add an extra day before heavy vehicle traffic if you’re at all uncertain about conditions. It costs you nothing but a little patience, and it’s cheaper than redoing a driveway.
When to seal new concrete versus existing concrete
New concrete needs 28 days to cure before you apply a standard film-forming sealer. This is the industry baseline, and it exists because concrete continues releasing moisture and completing its chemical hardening process for weeks after it looks finished. Sealing too early traps that moisture under the film, which is one of the most common causes of hazing and adhesion failure on brand-new driveways.
The exception is cure-and-seal products, which are specifically engineered to go on fresh concrete rather than wait for the 28-day mark. These products work as both a curing compound and a protective seal, applied within hours of finishing rather than weeks later. That’s a fundamentally different job than resealing an existing driveway, so don’t assume a standard acrylic sealer behaves the same way just because the can says “acrylic.”
- New pour, standard sealer: wait the full 28 days minimum.
- New pour, cure-and-seal product: apply within hours of finishing, following the manufacturer’s specific window.
- Existing slab, any sealer: confirm the surface is fully dry, not just the top 5 millimetres.
Sealing an older slab carries its own risk if you skip the moisture check. A driveway that looks perfectly dry on the surface can still be damp a few centimetres down, especially after a wet season or if it’s poorly graded and holding groundwater. That trapped moisture pushes up through the sealer film as vapour, causing the milky white haze known as blushing, or in worse cases, complete adhesion failure where the sealer peels away in sheets. Thorough drying matters more than precise timing when you’re dealing with an older slab, since the calendar won’t tell you what’s happening below the surface.
A guide on when to seal Calgary concrete walks through three quick field tests for exactly this situation, and it’s worth a look if your slab has any history of drainage issues or standing water.
Common problems from getting the timing wrong
Most sealer failures trace back to one of four timing mistakes, and all of them are avoidable if you know what to watch for.
- Tire ghosting. Driving on a sealed surface too soon leaves permanent tire-shaped marks in the film. Manufacturer minimums for vehicle traffic sit around 24 to 48 hours, but professionals often add a full extra 24 hours beyond that minimum, and heavy vehicles like trucks or RVs may need up to 7 days before it’s safe.
- Milky white blushing. This cloudy haze is trapped moisture working its way through the film, usually from sealing a damp substrate or catching an unexpected rain shower during the cure window.
- Bubbling and delamination. Coats applied too thick, or a second coat applied outside the recoat window, both trap material underneath a surface that’s already sealed itself off.
- Missed recoat windows compound the bubbling risk because the first coat has already partially cured, and a fresh coat on top won’t bond properly without extra prep.
Professionals commonly build in a buffer well beyond the manufacturer’s stated minimum specifically to avoid tire ghosting, since heavy vehicle traffic in particular can require up to 7 days in some cases rather than the 24 to 48 hours listed for standard cars.
A small test patch in an inconspicuous corner, checked after the recommended recoat window, catches most of these problems before they become a whole-driveway redo. It costs you 20 minutes and saves you a weekend.
Simple tests to check if sealed concrete is ready
You don’t need lab equipment to confirm a sealer is ready for the next step. A few low-tech checks will tell you almost everything you need to know before you open the surface to traffic.
- The tack test. Press a gloved finger or a clean cloth lightly against the surface. If it feels dry with no pull or residue transfer, you’re likely past the tack-free stage. If your finger sticks even slightly, wait longer.
- The water test. For film-forming sealers, a few drops of water should bead up and sit on the surface rather than soaking in. For penetrating sealers, the opposite is true. Water should absorb slowly rather than pooling, since the whole point of a penetrating product is to react below the surface, not sit on top of it.
- The adhesion patch. Apply a small piece of tape to a corner of the sealed surface, press firmly, and peel it back sharply. If sealer comes off with the tape, the coat hasn’t bonded properly yet, and you need more cure time.
- The scratch test. Lightly drag a fingernail across the surface at a low angle. A properly cured film resists marking; a still-soft one will scuff.
Pro Tip: Run all four tests in the same spot rather than scattering them across the slab. Conditions can vary enough from one corner to another that a passing test on the shady side doesn’t guarantee the same result in full sun.
If a test patch keeps failing after 48 hours past the expected cure window, or you’re seeing large-area blushing or bubbling rather than a small isolated spot, that’s the point to call a professional rather than keep experimenting. Persistent problems usually mean something below the surface, like trapped moisture, and that’s harder to diagnose and fix without stripping the coating entirely.
How long to wait between coats of sealer
Recoat windows commonly run 4 to 24 hours, and getting this window wrong in either direction causes real problems. Apply too soon, and you trap solvent or moisture from the first coat underneath the second, which shows up later as bubbling or a cloudy film. Wait too long past the window, and the first coat cures hard enough that the second coat can’t properly bond to it, leading to peeling or delamination down the line.
- Minimum recoat time exists to let the first coat flash off enough solvent or water to avoid trapping it.
- Maximum recoat time exists because most sealers rely on some level of surface tackiness or incomplete cure in the first coat to chemically bond with the second.
- Missing the window on the late side doesn’t mean you’re stuck. A light abrasion or solvent wipe of the surface per the product label restores enough surface texture for the second coat to bond properly.
If you’re unsure whether you’re inside the window, checking the TDS for your exact product beats guessing. A roofing industry guide on recoat timing covers the same underlying principle that applies across coatings generally: minimum and maximum recoat windows exist for chemical bonding reasons, not arbitrary scheduling convenience, and skipping either end of that window creates a weaker finished surface regardless of the material.
Weather, safety, and handling precautions before you seal
A few safety basics matter as much as the timing math, especially with solvent-based products.
- Ventilation and PPE. Solvent-based sealers release fumes as they cure. Work in open air where possible, and if you’re sealing an enclosed garage, run fans and keep the door open well past the application window, not just during it.
- Weather limits. Don’t apply if rain or heavy dew is expected within 12 to 24 hours, and avoid application below roughly 10°C, per Quikrete’s guidance. Cold slows the chemical reaction and increases the odds of a failed cure.
- Storage and cleanup. Seal cans tightly between uses, clean rollers and sprayers immediately with the appropriate solvent, and store leftover product away from heat sources.
- Odour management. VOC-heavy solvent products can linger in enclosed spaces for a day or more. If you’re sealing an attached garage, plan for reduced access to that space, not just the driveway outside it.
None of this is complicated, but skipping it is exactly how people end up with a sealer that looks fine on day one and fails within a season.
Yearlong perspective: what actually changes the timeline on real jobs
The 28-day rule for new concrete isn’t a suggestion we bend for anyone, including ourselves. We’ve seen homeowners try to seal a fresh driveway at three weeks because it “looked ready,” and the moisture trapped underneath showed up as blushing within a month. When a client wants protection sooner than that, cure-and-seal applied at finishing time is the honest answer, not a shortcut around the 28-day window.
What surprises most homeowners isn’t the sealer chemistry. It’s how much a shaded, north-facing section of the same driveway can lag behind the sunny half. We schedule warm-weather jobs with a same-day recoat in mind and cool-weather jobs with an overnight buffer built in, because Calgary’s swing between a 22°C afternoon and a 6°C evening in the same day isn’t rare, and it changes everything about when that second coat is actually ready.
The buffer beyond the manufacturer minimum isn’t caution for its own sake. It’s the difference between a driveway that looks good in June and one that’s already showing tire marks by August.
— Lewie
Concrete sealing service: what we do and how to book
If the weather-watching and recoat math above sounds like more than you want to manage around a work schedule, that’s exactly the gap a professional service fills for Calgary homeowners. A comprehensive concrete sealing service covers the full job: pressure washing and cleaning the surface, checking for moisture and prep issues before application, applying two thin coats with the correct recoat window for the product, and offering a satisfaction guarantee.

DIY sealing works fine for a small patio on a predictable weekend. It gets harder on a large driveway, a job squeezed into an unpredictable Calgary forecast, or a slab where you’re not sure if it’s actually dry enough below the surface. That’s where hiring a pro saves you the guesswork, and where getting the timing wrong costs the most in redo work.
If you’re planning a sealing job this season, consider reaching out through the concrete sealing page for a quote, and the scheduling will be managed around Calgary’s weather rather than a generic calendar estimate.
Sources
- EVERCLEAR technical datasheet (Euclid)
- Cure and Seal product technical data sheet (Bullbond)
- Quikrete acrylic concrete cure & seal product guide (TDS)
- WR Meadows blog: when is the best time to apply acrylic sealers